How to Install CUSTOM Polymer-Modified Mortars
Polymer modified mortar has become a go-to solution in modern construction due to its superior strength, flexibility, and adhesion. Working on tile installations, surface leveling, or general masonry applications? This cement-based mix provides a long-lasting bond that traditional mortars often lack.
Understanding the proper installation techniques is key to achieving professional-grade results. From surface preparation and adequate mixing to application and curing, every step plays a role in making sure the mortar performs as intended. This guide shares tips on how to install CUSTOM polymer-modified mortars.
What Is Polymer Modified Mortar?
Polymer modified mortar is a cement-based mix with added polymers that improve its performance. This combination makes it stronger, more flexible, and resistant to cracking. These characteristics make it ideal for interior and exterior projects where traditional mortar is not durable enough.
The added polymers enhance adhesion. They enable the mortar to bond better with a variety of surfaces, including concrete, stone, and tile.
When mixed and installed correctly, polymer modified mortar offers long-lasting performance. It performs well in areas exposed to high moisture, temperature changes, and heavy use. If you’re working on a residential or commercial project, this mortar is a reliable choice for creating a secure, high-quality finish.
Why Choose Polymer Modified Mortar for Your Project?
Using polymer modified mortar has several advantages over traditional mortar mixes. Some key benefits include:
- Stronger Bonding: The polymers help create a firm adhesive grip. It’s ideal for vertical and overhead applications.
- Crack Resistance: Flexibility reduces the risk of cracking, even in areas exposed to frequent movement or temperature shifts.
- Moisture Resistance: Works well in wet environments like bathrooms, kitchens, and outdoor spaces.
- Better Workability: The improved mix consistency makes spreading and setting easier.
Tools and Materials You’ll Need
Before getting started, gather the necessary tools and materials:
Materials
- Polymer modified mortar (based on project requirements)
- Water or latex additive (as specified on the product packaging)
- Substrate primer (if required for better adhesion)
Tools
- Mixing bucket
- Drill with a mixing paddle
- Trowel (notched or flat, depending on application)
- Sponge and clean water
- Rubber float (for tile applications)
- Level and measuring tape
Having everything on hand will make the installation smoother and help achieve a professional finish.
Step-by-Step Guide: How to Install Polymer Modified Mortar
A structured approach will help you apply polymer modified mortar correctly and achieve the best results.
Step 1: Prepare the Surface
A clean, stable surface is key to proper adhesion. Remove any dirt, dust, grease, or loose debris before application. Use a primer to improve bonding, especially on porous or non-absorbent surfaces if needed. Allow the primer to dry as directed before proceeding.
Step 2: Mix the Mortar Correctly
- Pour the recommended amount of water or latex additive into a mixing bucket.
- Gradually add the polymer-modified mortar while mixing it with a drill and paddle.
- Blend until you achieve a smooth, lump-free consistency.
- Let the mix sit for 5-10 minutes, then stir before applying.
Avoid adding excessive water, which can weaken the mortar’s strength and bonding properties.
Step 3: Apply the Mortar
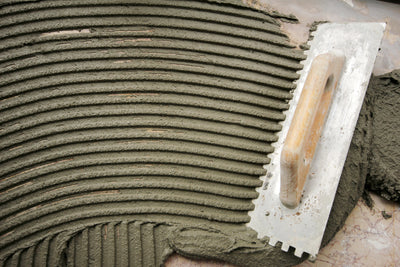
Use a trowel to spread the mortar onto the prepared surface. Use a notched trowel to create ridges for tile applications. A trowel can help with proper adhesion. Work in small sections to prevent drying before placement.
If using the mortar for repairs or leveling, spread it evenly with a flat trowel and smooth out as needed.
Step 4: Place Tiles or Materials
If setting tiles, press them firmly into the mortar and move slightly to create a strong bond. Use spacers for uniform gaps. Apply steady pressure for other materials and check alignment with a level.
Step 5: Allow Proper Curing
Curing time varies based on environmental conditions and the specific product used. Generally, avoid walking on or applying pressure for at least 24 hours. Extended curing may be necessary for outdoor or high-moisture applications.
Common Mistakes to Avoid
To get the best results, watch out for these common mistakes:
- Incorrect mixing ratios: Too much water weakens the mortar, while too little makes it difficult to spread.
- Applying to an unclean surface: Dirt and debris can prevent proper adhesion.
- Rushing the curing process: Allow enough time for the mortar to set before applying additional weight or pressure.
Quality Materials for a Professional Finish
At Elit Tile Corp., quality materials make all the difference in your projects. That’s why we offer a selection of high-performance tiling and flooring solutions for professionals and DIY enthusiasts.
If you need polymer modified mortars, specialized adhesives, or durable surface treatments, we have the products to help you do the job right.
Start with the right materials for professional-grade results—shop our collection today. Take your projects to the next level.
